Clean Silver Jewelry: The Complete At-Home Guide

How to Clean Silver Jewelry: The Complete Method-by-Method Guide
If your silver jewelry has gone dull, dark, or yellowish, the fix is usually quick. For most everyday tarnish, mild dish soap and warm water will clean it safely. For heavier tarnish, a baking soda and aluminum foil soak removes it in minutes through a simple chemical reaction. The method you should pick depends on three things: what kind of silver you have, how bad the tarnish is, and whether your piece has gemstones, pearls, or other delicate materials attached.
That’s the short version. Now let’s get into the details, because the “right” method really does change depending on your specific piece, and using the wrong one can do more harm than the tarnish ever would.
Identify Your Silver Before You Clean It
Before you grab anything from your kitchen cabinet, take thirty seconds to figure out exactly what you’re working with. This single step prevents most of the jewelry-cleaning disasters people post about online.
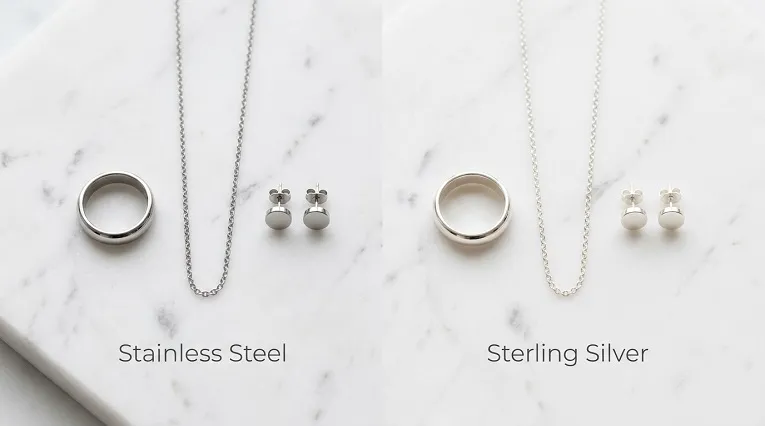
Sterling Silver vs. Fine Silver vs. Silver-Plated: Why It Changes Your Method
Pure silver, sometimes called fine silver, is too soft on its own to hold up to daily wear. That’s why almost all silver jewelry is actually an alloy. Sterling silver is the standard you’ll see most often, and it’s made of 92.5% silver mixed with 7.5% of another metal, usually copper. That copper is what gives the piece strength, but it’s also what makes sterling silver tarnish faster than pure silver would on its own. The copper reacts with sulfur in the air a little more readily, which speeds up the whole process.
Silver-plated jewelry is a different animal entirely. It’s a base metal like brass or copper with a thin layer of silver bonded to the surface. That layer can be incredibly thin, sometimes just a few microns. This matters enormously for cleaning, because anything abrasive that would barely scuff solid sterling silver can wear straight through silver plating and expose the base metal underneath. Once that happens, there’s no fixing it at home.
A quick real-world example: I’ve seen people use the exact same baking soda scrub on a sterling silver ring and a silver-plated bracelet, with completely different results. The ring came out fine. The bracelet developed a dull yellow patch where the plating thinned out. Same method, same person, very different outcome, because the underlying metal wasn’t the same.
How to Check: Hallmarks, the Magnet Test, and Other Quick Tests
Most jewelry tells you what it’s made of if you know where to look. Flip the piece over and look for tiny stamped numbers or letters, usually on the inside of a ring band, the back of a pendant, or near the clasp of a bracelet or necklace.
Here’s what those marks usually mean:
- 925 or “Sterling” means sterling silver (92.5% pure silver)
- 999 or “Fine Silver” means pure silver, which is rare in jewelry because it’s so soft
- EP or EPNS stands for electroplated, meaning the piece is silver-plated over a base metal
- No mark at all often (but not always) suggests silver plating or a costume piece
If you can’t find a mark, or the mark has worn away, try the magnet test. Silver itself is not magnetic. Hold a small, strong magnet near the piece. If it pulls toward the magnet, you’re almost certainly looking at a base metal with a thin silver coating, since most of the metals used as a base for plating do respond to magnets. If there’s no pull at all, that’s a good sign it’s solid silver, though it isn’t a perfect test on its own. When in doubt, a jeweler can confirm the metal type in under a minute with an acid test or an electronic tester, and it’s worth asking if you’re not sure about a valuable or inherited piece.
Why Silver Jewelry Tarnishes
Understanding what’s actually happening on the surface of your jewelry makes the rest of this guide click into place, and it also explains why some cleaning methods work so well while others don’t do much at all.
The Science in Plain English: Silver Sulfide and Sulfur Exposure
Tarnish is not dirt. It’s a chemical reaction. When silver comes into contact with sulfur compounds in the air, most commonly hydrogen sulfide, the silver atoms on the surface bond with the sulfur to form a new compound called silver sulfide. This is the same reaction chemists demonstrate in classrooms to teach basic chemistry, and it’s well documented in materials science research. Silver sulfide has a dark, almost black color, which is why heavily tarnished silver looks blackened rather than just dull.
Here’s something most cleaning guides skip entirely: that dark layer is technically protective. Once silver sulfide forms on the surface, it actually slows down further tarnishing underneath it, similar to how rust on the outside of an old tool can sometimes protect the metal below it. That doesn’t mean you should leave it there. It just means tarnish, while ugly, isn’t actively eating away at your jewelry the way some other forms of corrosion do.
This also explains why the classic aluminum foil trick works so well, which we’ll cover in detail in the next section. Aluminum bonds with sulfur more easily than silver does, so when you create the right conditions, the sulfur atoms essentially switch partners and move from the silver onto the aluminum instead. It’s a genuinely clever bit of chemistry hiding inside a kitchen hack.
What Speeds Up Tarnish: Humidity, Skin Oils, Lotion, and Chlorine
A few everyday conditions make this reaction happen faster:
- Humidity gives the sulfur compounds in the air a way to settle onto the metal more easily
- Perfume, hairspray, and lotion often contain sulfur-based ingredients or compounds that react with silver
- Skin oils and sweat contain amino acids and sulfur compounds that can tarnish silver from direct contact
- Chlorine from pools and hot tubs is particularly aggressive and can tarnish silver within a single swim
- Rubber and latex release sulfur compounds as they age, which is why storing silver near rubber bands or in certain drawer liners speeds up tarnishing
If you live somewhere humid, or you wear your silver while exercising or swimming, you’ll notice tarnish forming noticeably faster than someone in a dry climate who only wears their jewelry occasionally.
How to Choose the Right Cleaning Method for Your Situation
Most guides on this topic just list methods one after another and let you figure out which one applies to you. That’s backwards. The smarter approach is to start with your specific situation and work outward from there.
Light Tarnish, Heavy Tarnish, or Antique Patina? A Quick Decision Guide
Ask yourself these questions first:
Is the tarnish light, just a slight dullness or faint yellowing? Go with mild soap and water. It’s gentle, it’s safe for almost every type of silver and most gemstones, and it’s usually enough to restore the shine.
Is the tarnish heavy, dark, or black? The baking soda and aluminum foil method is your best bet. It works fast and handles stubborn tarnish that soap alone won’t touch.
Does the piece have an intentionally dark, antique finish (oxidized silver)? Stop and read the section on antique and oxidized silver further down before doing anything. Standard tarnish-removal methods will strip away a finish that was put there on purpose.
Does the piece have pearls, opals, turquoise, or other soft or porous gemstones? Skip soaking methods entirely. Jump to the section on cleaning silver with delicate gemstones.
Is the piece silver-plated rather than solid sterling? Use the gentlest method available, and avoid anything abrasive. There’s a dedicated section below with specifics.
This decision process takes about ten seconds once you know what you’re looking at, and it prevents almost every common cleaning mistake before it happens.
At-Home Methods to Clean Silver Jewelry, Ranked by Effectiveness
These are the methods that actually work, organized from gentlest to strongest so you can match the method to your tarnish level rather than reaching for the strongest option by default.
Method 1: Mild Soap and Water (Safest, Best for Light Tarnish and Gemstones)
This is where you should start almost every time, especially if you’re not sure how tarnished a piece really is or whether it has gemstones that need special care.
- Fill a small bowl with warm (not hot) water
- Add a few drops of mild dish soap, the kind without added moisturizers or dyes
- Place your jewelry in the bowl and let it soak for five to ten minutes
- Use a soft-bristled toothbrush to gently clean crevices, settings, and detailed areas
- Rinse thoroughly under running water
- Pat dry immediately with a soft, lint-free cloth
This method is genuinely safe for nearly all sterling silver, most gemstone settings, and even silver-plated pieces, as long as you’re gentle with the brushing. It won’t touch heavy black tarnish, but for regular upkeep and light dulling, it’s all you need.
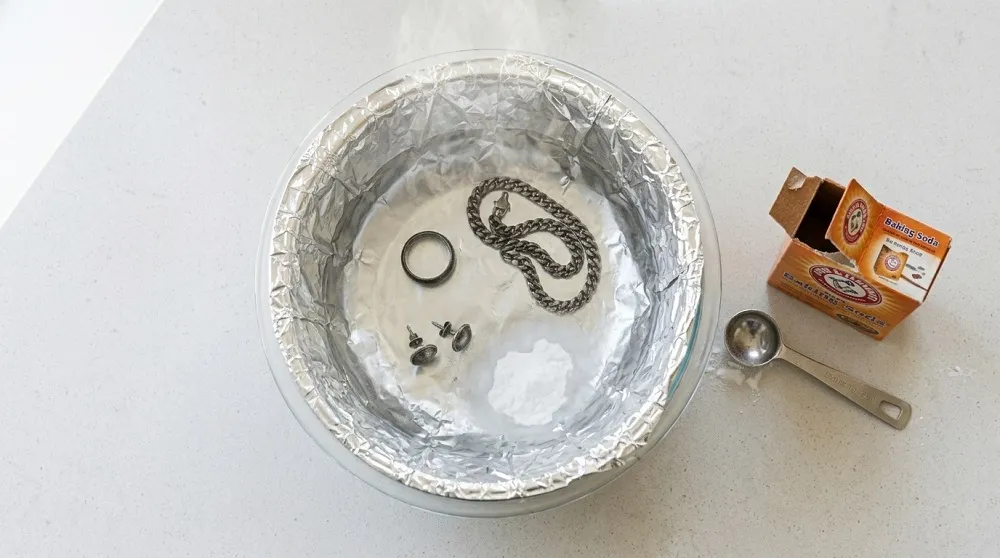
Method 2: Baking Soda and Aluminum Foil (Best for Heavy Tarnish)
This is the method that surprises people the most, because it looks like a magic trick the first time you try it.
- Line a glass or ceramic bowl with aluminum foil, shiny side facing up
- Place your tarnished silver jewelry directly on the foil, making sure each piece touches the foil
- Boil water and pour about two cups into the bowl
- Add one tablespoon of baking soda for every cup of water and watch it fizz slightly
- Let the jewelry sit for two to five minutes for moderate tarnish, up to ten minutes for very heavy tarnish
- Remove the jewelry with tongs or a spoon, since the water will be hot
- Rinse under cool water and dry completely with a soft cloth
You’ll notice a faint sulfur smell during this process, similar to rotten eggs. That’s completely normal and means the reaction is working as expected.
Why It Works: The Electrochemical Reaction Explained
Here’s the part most articles gloss over. Aluminum is more chemically reactive than silver, meaning it bonds more readily with available sulfur. When you create a hot water bath with baking soda acting as an electrolyte, you set up the conditions for the sulfur atoms sitting on your silver (the tarnish itself) to detach from the silver and bond to the aluminum foil instead. The silver sulfide breaks apart, the silver returns to its original metallic state, and the aluminum foil takes on a dull, slightly discolored appearance because it’s now holding the sulfur that used to be on your jewelry.
This isn’t a guess or folk wisdom. It’s a documented electrochemical reaction that chemistry educators use as a classroom demonstration of displacement reactions. The same basic principle is why magnesium, which is even more reactive than aluminum, can pull tarnish off even faster in side-by-side tests, though aluminum foil is far easier to find in a kitchen drawer.
Method 3: White Vinegar and Baking Soda (Best for Moderate, Stubborn Tarnish)
This combination sits between the gentleness of soap and water and the strength of the foil method, making it a solid middle option.
- Place your jewelry in a small glass bowl
- Pour in enough white vinegar to fully cover the piece
- Add two tablespoons of baking soda and let the fizzing settle
- Let the jewelry soak for two to three hours for stubborn tarnish
- Rinse thoroughly under cool water
- Dry completely and buff gently with a soft cloth
Vinegar itself does not damage silver and will not cause tarnish, since it’s the acetic acid working to loosen built-up grime rather than reacting with the metal in a harmful way. That said, undiluted vinegar left on silver for many hours at a time, repeated week after week, can eventually affect softer metals or thin plating, so this is a once-a-month method rather than a weekly habit. Skip this one entirely for pieces with porous gemstones, since the acid can damage stones like opal or turquoise even if it leaves the silver untouched.
Method 4: Silver Polishing Cloths and Creams (Best for Quick Touch-Ups)
When you just need a fast shine before heading out the door, a polishing cloth is hard to beat.
These cloths come pre-treated with a mild polishing compound built into the fabric. Simply rub the jewelry with light, back-and-forth strokes rather than circular motions, since circular rubbing can create tiny swirl marks over time that become visible under direct light. No water, soaking, or drying time needed, which makes this the method most people reach for between deeper cleanings.
Silver creams work similarly but come as a paste you apply with a separate soft cloth, then rinse off. They tend to be slightly more effective on stubborn spots than a polishing cloth alone, but they take a few extra minutes because of the rinsing step.
What to Realistically Expect From Each Method
It helps to know roughly what each method can and can’t do before you commit to one.
| Method | Best For | Time Needed | Limitations |
|---|---|---|---|
| Soap and water | Light dulling, gemstone pieces | 5-10 minutes | Won’t remove dark or black tarnish |
| Baking soda and foil | Heavy, dark tarnish | 2-10 minutes | Not for porous gemstones or oxidized finishes |
| Vinegar and baking soda | Moderate, stubborn tarnish | 2-3 hours | Slower; avoid on porous stones |
| Polishing cloth or cream | Quick touch-ups, maintenance | 1-5 minutes | Limited effect on heavy tarnish |
If you try soap and water first and the tarnish barely budges, that’s your signal to move up to the foil method rather than scrubbing harder with the same gentle approach. Matching effort to tarnish severity saves time and protects your jewelry from unnecessary handling.
What NOT to Use on Silver Jewelry (and Why)
Knowing what to avoid matters just as much as knowing what to use, especially since the internet is genuinely split on a few of these.
Toothpaste: Why the Internet Disagrees, and What’s Actually True
You’ll find guides confidently telling you to use toothpaste on silver, and just as many telling you never to touch it. Both sides have a point, and the disagreement comes down to one thing: toothpaste formulas vary enormously in how abrasive they are.
Plain, old-fashioned white toothpaste without whitening agents contains mild abrasive particles meant to be gentle enough for tooth enamel, which is actually harder than sterling silver. Used briefly and gently, this can buff away light tarnish. The problem is that most toothpaste sold today includes whitening agents, micro-beads, baking soda boosters, or charcoal, all of which are noticeably more abrasive and were never designed with metal surfaces in mind. On solid sterling silver with a smooth finish, this might just mean some extra fine scratching that’s hard to notice. On silver-plated jewelry, or pieces with a brushed or detailed finish, that same toothpaste can wear through the surface or flatten fine engraving.
My honest take: there are better, more predictable options available (the methods above), so toothpaste isn’t necessary even on the pieces where it would technically be safe. If you do choose to try it anyway, use a plain, non-whitening, non-gel formula, apply it gently with your finger rather than a brush, and test it on a small hidden spot first.
Bleach, Ammonia, Windex, and Other Household Chemicals to Avoid
These products show up in some older cleaning advice, but they’re worth avoiding for a simple reason: they’re formulated for glass and hard surfaces, not for soft precious metals. Chlorine bleach actively accelerates tarnishing and can pit the surface of silver. Ammonia-based cleaners can be harsh enough to damage certain gemstone treatments and can dull the surface of softer metals over repeated use. The risk-to-reward ratio here just isn’t good when gentler methods work just as well without the chance of permanent damage.
Lemon Juice and Other Overly Acidic Hacks
Lemon juice shows up in a few cleaning hacks because citric acid can cut through grime. The trouble is that lemon juice is considerably more acidic than diluted white vinegar, and that extra acidity can be harsh enough to etch the surface of silver with repeated use, leaving it looking slightly frosted rather than shiny. If you want an acid-based method, stick with the vinegar and baking soda combination above, which is milder and better documented for jewelry use specifically.
How to Clean Silver Jewelry by Type
Different pieces of jewelry have different vulnerable points, so the right technique shifts slightly depending on what you’re cleaning.
Silver Rings, With and Without Gemstones
For a plain silver band with no stones, any of the methods above will work well, with the foil method handling heavy tarnish particularly fast since rings are small and fully submerge easily.
For rings with gemstones, identify the stone first. Diamonds, sapphires, and rubies are hard and generally safe with the soap and water method, including light brushing around the setting. Softer or porous stones need a different approach entirely, which is covered in its own section below. A useful habit for any ring with stones: clean it over a towel or a bowl rather than an open sink, since loose stones occasionally work free during cleaning and a towel gives you a chance to catch them.
Silver Necklaces and Chains
Chains tarnish faster than other jewelry types because the many small links create more surface area exposed to air, and the constant contact with skin oils along the chain’s length accelerates the reaction. For simple tarnish, lay the chain flat in the baking soda and foil setup, making sure every link makes contact with the foil. For stubborn spots, particularly where the clasp sits against the skin, lay the chain on a soft cloth and use a cotton swab dipped in cleaning solution to work along individual sections.
When rinsing a chain, use a small strainer or cup your hand underneath the drain. Thin chains can slip through a standard sink drain surprisingly easily, and that’s a frustrating way to lose a piece you were just trying to clean.
Silver Earrings: Posts, Hooks, and Studs
Earrings deserve a slightly different conversation because they sit directly against your earlobe, which means hygiene matters here in a way it doesn’t for a bracelet or ring.
Clean the visible silver portions using soap and water or the foil method depending on tarnish level. For the posts and hooks specifically, which build up natural oils and sometimes residue from earring backs, a separate wipe with a cotton swab dampened in rubbing alcohol helps disinfect the area that actually touches your skin. Just keep alcohol away from any gemstones or pearls attached to the earring, since it can dull certain stone surfaces with repeated contact.
Silver-Plated Jewelry: A Different, Gentler Approach
Silver-plated pieces need their own mindset because that thin silver layer simply can’t take the same handling as solid sterling.
Stick to mild soap and water as your default method. If tarnish is heavy enough that soap isn’t cutting it, the baking soda and foil method can still work, but keep soak times short, on the lower end of the range rather than the higher end, and avoid any scrubbing once the piece is out of the bath. Skip toothpaste, abrasive powders, and polishing creams meant for solid silver, since these are formulated assuming there’s enough base metal thickness to tolerate some material loss. Plating doesn’t have that buffer. Once you scrub through to the base metal underneath, that spot will show a different color permanently, and there’s no home fix for it.
Pieces with Pearls, Opals, or Turquoise: Never Soak These
This is one of the most important rules in this entire guide. Pearls, opals, turquoise, coral, and amber are porous or delicate in ways that hard gemstones like diamonds and sapphires simply aren’t. Soaking these stones in any solution, including plain water, can cause them to absorb moisture, change color, develop cracks, or lose their luster permanently. Opals in particular are prone to cracking if they dry out too quickly after absorbing liquid.
The fix is to clean around these stones, never throw them. Use a cloth that’s barely damp, not wet, with a touch of mild soap, and wipe only the silver portions of the piece. Use a second, dry cloth to gently wipe the stone itself if needed, working with the grain of any texture rather than scrubbing. If a piece like this has heavy tarnish and you’re not comfortable cleaning around delicate stones yourself, this is a reasonable case for letting a professional jeweler handle it, since they have tools designed specifically to isolate gemstones from cleaning solutions.
Antique or Oxidized Silver: Preserving the Patina
Here’s something that trips up even careful jewelry owners: some silver pieces are designed to be partially black. Jewelers intentionally darken the recessed areas of detailed designs, a technique called oxidizing, to make engraved patterns, filigree, or sculpted details stand out more clearly against the polished silver around them. This dark finish looks like tarnish, but it’s actually a deliberate design choice.
If you run a standard tarnish-removal method on an oxidized piece, you can strip away that intentional darkening along with the unwanted tarnish, leaving the design looking flat and washed out compared to its original appearance. Before cleaning any antique, vintage, or heavily detailed silver piece, look closely at whether the dark areas follow a deliberate pattern (inside engraved lines, within carved details) versus an even, all-over dulling that suggests genuine tarnish. When in doubt, clean only the raised, polished surfaces with a very light touch using a polishing cloth, and leave the recessed dark areas alone. For genuinely valuable or irreplaceable antique pieces, a professional jeweler experienced with antique silver is worth the cost, since they can clean safely without disturbing original finishes.
How to Prevent Silver Jewelry From Tarnishing
Cleaning tarnish is useful to know, but slowing down how often you need to do it is even more valuable.
Proper Storage: Pouches, Silica Gel, and Anti-Tarnish Strips
How you store silver between wears makes a bigger difference than most people realize. Plastic bags trap humidity against the metal, which actually speeds up tarnishing rather than preventing it, so they’re one of the worst common storage choices despite being convenient. A better option is an anti-tarnish cloth pouch, which is treated with materials that absorb sulfur compounds from the air before they reach your silver. Dedicated anti-tarnish strips work the same way and can be tucked into a regular jewelry box or drawer.
Silica gel packets, the small packets that come inside shoe boxes and vitamin bottles, work well too, since they pull moisture out of the air in the immediate area around your jewelry. Keep silver pieces separated from each other in storage, since pieces touching directly can scratch one another, and never store silver touching rubber bands, rubber-lined drawers, or certain types of felt that contain sulfur compounds as part of their manufacturing process.
Daily Habits That Slow Down Tarnish
A few small habits add up to a noticeable difference over months of wear.
Put your silver jewelry on last when getting ready, after applying lotion, perfume, and hairspray, since these products are common tarnish accelerants and direct contact speeds up the reaction. Take it off first when you get home, before showering, exercising, or swimming, since chlorine and sweat are particularly aggressive triggers. Wearing silver regularly, somewhat counterintuitively, actually helps keep it shinier longer, because the natural oils in your skin create a thin protective layer and the gentle friction from daily wear keeps light tarnish from building up in the first place. Pieces that sit untouched in a drawer for months often tarnish faster than ones worn weekly.
For cleaning frequency, there’s no single universal number, but a reasonable rule of thumb is to give frequently worn pieces a light soap and water clean about once a month, and save the stronger baking soda methods for whenever visible tarnish actually shows up rather than on a fixed schedule.
When to Take Silver Jewelry to a Professional
Most tarnish is a perfectly safe do-it-yourself job, but a few situations genuinely call for professional help.
Ultrasonic and Steam Cleaning: What They Do Differently
Professional ultrasonic cleaners use high-frequency sound waves to create tiny bubbles in a cleaning solution. Those bubbles collapse against the jewelry’s surface with enough force to dislodge dirt from crevices, filigree, and detailed engraving that a toothbrush simply can’t reach. This makes ultrasonic cleaning excellent for intricate designs, but it’s not universally safe. Pieces with glued-in stones, porous gemstones like pearls or opals, and antique pieces with original patina should generally avoid ultrasonic cleaning, since the vibration can loosen settings or strip delicate finishes.
Steam cleaning works differently, using a focused jet of steam to blast away dirt and residue without any chemicals or soaking involved. It’s a gentler option than ultrasonic for many gemstone pieces, though it’s typically a service offered at jewelry stores rather than something available at home.
Signs Your Piece Needs a Jeweler, Not a DIY Fix
A few situations are worth a trip to a professional rather than a home remedy. If tarnish remains heavy and dark after trying the foil method, there may be deeper buildup that needs stronger professional-grade tools. If you notice a loose stone, a bent prong, or any structural issue alongside the tarnish, cleaning at home risks losing a stone entirely, so repair should come before cleaning. Pieces with genuine sentimental or financial value, especially inherited or antique jewelry, are worth the modest cost of professional cleaning simply for peace of mind, since a mistake at home can’t always be undone.
Frequently Asked Questions
Is baking soda bad for silver jewelry?
Baking soda is safe for solid sterling silver when dissolved in water, such as in the foil method or a diluted paste. It becomes risky only when used as a dry, undiluted paste scrubbed directly onto silver-plated jewelry, where the abrasive texture can wear through the thin silver layer.
Does toothpaste scratch silver?
It can, depending on the formula. Plain, non-whitening toothpaste used gently causes minimal risk on solid sterling silver, but most modern toothpastes contain whitening agents or abrasive boosters that are more likely to leave fine scratches, especially on silver-plated or detailed pieces.
Can I use gold jewelry cleaner on silver?
Generally, no. Most gold-specific cleaners are formulated for gold’s particular alloy composition and aren’t tested for silver, particularly silver-plated pieces. Some “all-metal” cleaners are labeled safe for both, so check the product label directly rather than assuming.
How often should I clean my silver jewelry?
There’s no strict schedule, but a light soap and water clean about once a month for frequently worn pieces, plus a deeper clean whenever visible tarnish appears, keeps most silver jewelry looking its best without overcleaning it.
What’s the fastest way to clean silver jewelry at home?
The baking soda and aluminum foil method is the fastest option for visible tarnish, typically working within two to five minutes thanks to the electrochemical reaction that transfers sulfur from the silver to the foil. For light dulling rather than dark tarnish, soap and water works almost as quickly.
Conclusion on Caring for Silver Over the Long Run
Silver jewelry is meant to be worn, not preserved behind glass. Tarnish is simply part of owning something made from a reactive metal, and the good news is that nearly every case of it can be reversed safely once you know which method fits your specific piece. Start gently, match the method to the actual tarnish level rather than reaching for the strongest option out of impatience, and pay extra attention to gemstones, pearls, and antique finishes that need a different kind of care than plain sterling silver. With those habits in place, your silver should keep its shine for years, and the cleaning itself becomes a quick five-minute task rather than something to dread.